
Introduction: Why Sorting Matters in Excel
Excel is one of the most powerful tools for organizing and analyzing data. Whether you’re dealing with a list of names, sales records, inventory details, or academic results—sorting your data can make it easier to read, compare, and make decisions. In this guide, we’ll show how to add sort button in Excel so that you can instantly sort rows and columns without manual effort. This article is designed for both beginners and regular Excel users who want to improve their workflow.
What Is the Sort Button in Excel?
The Sort button in Excel is a tool that helps you rearrange your data either in ascending (A-Z) or descending (Z-A) order. You can apply this to:
- Text (A to Z or Z to A)
- Numbers (Smallest to Largest or Largest to Smallest)
- Dates (Oldest to Newest or Newest to Oldest)
It is especially helpful when working with long lists or tables.
Where to Find the Sort Button in Excel
By default, the Sort button is located in:
Home Tab → Editing Group → Sort & Filter
or
Data Tab → Sort & Filter Group
However, if you want quick access, you can add a custom sort button to your Quick Access Toolbar or right-click menu.
Step-by-Step Guide: How to Add Sort Button in Excel

Here is the step-by-step guide to help you add and use the Sort button effectively:
1. Open Your Excel Sheet
Start by opening the Excel workbook in which you want to sort the data. Make sure the data is organized in rows and columns, and each column has a header (title).
2. Select the Data Range
Highlight the column or table range that you want to sort. Including headers in the selection ensures that Excel understands the structure.
3. Use the Built-In Sort Options
Go to the Data Tab and click on:
- Sort A to Z (for ascending)
- Sort Z to A (for descending)
This will instantly rearrange the selected column while keeping the rows intact.
4. Add the Sort Button to the Quick Access Toolbar (Optional but Useful)
Want faster access? Here’s how you can add the Sort button to the Quick Access Toolbar:
Steps:
- Click the drop-down arrow on the Quick Access Toolbar (top-left corner).
- Choose More Commands.
- From the list, select “Commands Not in the Ribbon”.
- Scroll down to find Sort Ascending and Sort Descending.
- Click Add to move them to the right panel.
- Click OK.
Now your Sort buttons will always be visible at the top of your Excel window.
5. Apply Sort by Multiple Columns (Advanced Sorting)
If you want to sort your data by multiple levels—for example, first by Department, then by Name—follow these steps:
- Select the entire data table.
- Click Sort under the Data tab.
- In the Sort dialog box, choose:
- First level (e.g., Department)
- Add Level (e.g., Name)
- Click OK to apply the sort.
How to Sort Rows Instead of Columns
By default, Excel sorts columns vertically. But if you want to sort rows horizontally, here’s how:
- Select your data range.
- Go to Data → Sort.
- In the Sort dialog box, click Options.
- Choose Sort left to right.
- Pick the row you want to sort by.
- Click OK.
This method is useful for transposed data or matrix-style tables.
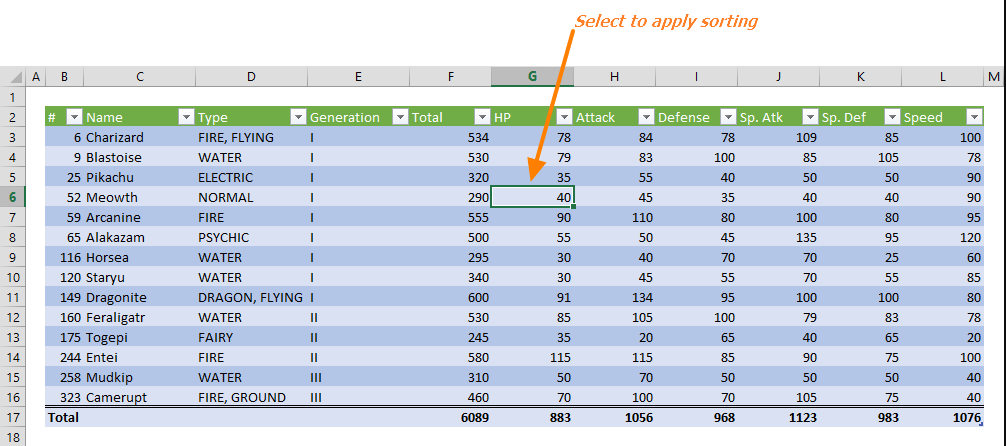
Add a Sort Button Using Filters (Another Handy Method)
Adding filters automatically includes sort buttons in each header cell.
Steps:
- Select the column headers.
- Click Home → Sort & Filter → Filter or press Ctrl + Shift + L.
- Small drop-down arrows will appear in each header.
- Click on the arrow in the column you want to sort.
- Choose Sort A to Z or Sort Z to A.
This is one of the most efficient ways to sort multiple columns interactively.
Custom Sorts: How to Sort by Color or Custom Order

Want to go beyond numbers and text?
To Sort by Cell Color:
- Select your table.
- Go to Data → Sort.
- Choose the column.
- Under Sort On, select Cell Color.
- Choose the color and order.
To Sort by Custom List:
- Go to File → Options → Advanced → Edit Custom Lists.
- Enter your custom order (e.g., « High, Medium, Low »).
- Use this list in the Sort dialog to apply custom sorting.
Common Mistakes to Avoid While Sorting
- Not including headers: Excel might treat headers as data.
- Selecting a single column only: This can break the row structure.
- Sorting without filters: Leads to incomplete data management.
- Empty rows or columns: They interrupt Excel’s range detection.
Time-Saving Tip: Use Keyboard Shortcuts for Sorting
If you sort data frequently, these shortcuts can save time:
- Alt + D + S: Open Sort dialog
- Alt + A + S + A: Sort A to Z
- Alt + A + S + D: Sort Z to A
When Should You Use a Sort Button?
Use a Sort Button when:
- You want to view the top-performing entries
- You need alphabetical or chronological order
- You’re preparing data for analysis or reports
- You’re cleaning up a messy dataset
Benefits of Adding a Sort Button in Excel
✅ Increased speed and efficiency
✅ Cleaner data presentation
✅ Better data insights
✅ Fewer manual errors
✅ Professional-looking spreadsheets
How to Add Sort Button in Excel
Q1: Can I sort data in Excel without affecting other columns?
A: No. Always select the full data range to keep row data together.
Q2: Can I undo a sort in Excel?
A: Yes. Use Ctrl + Z immediately after sorting.
Q3: Can I add a custom sort order?
A: Yes. Go to File → Options → Advanced → Custom Lists.
Q4: Is sorting available on Excel mobile or web?
A: Basic sorting is available, but advanced features may be limited.
Q5: How to remove the sort button or clear sorting?
A: Click Data → Sort → Clear to remove all sorting levels.
Conclusion: Make Excel Work for You
Adding a sort button in Excel is one of the simplest yet most powerful ways to manage your data effectively. Whether you’re a student, business professional, or researcher, sorting helps you understand and use your data better. From simple alphabetical lists to complex multi-column sorting, Excel’s sorting tools offer flexibility and control.
Now that you know how to add a sort button in Excel to instantly sort rows and columns, start applying these techniques in your daily tasks. You’ll not only save time but also become more confident in handling large datasets.
Laisser un commentaire